Have you ever worked with Virtual Reality? No? Possibly because it was just too expensive. Or you didn’t know any way to get into the matter without working yourself through hundreds of tutorials explaining VR coding in Unity or any other 3D software and you just felt overwhelmed.
Well… this stops today. Because what you’re reading now is the ultimate guide to creating your first VR project. And you do not need any coding skills to get started. Basically you don’t need a lot to begin although there might be some things to consider.
Prerequisites
1. A computer and WiFi
Although you don’t need any coding skills you still need a computer to get things up and running. You can use a Mac or Windows, doesn’t matter, but the computer should have some performance since you will be handling 360° data which could have big file sizes. You will also need WiFi for the computer (especially for the setup).
2. (Optional) A smartphone or VR headset with the VRdirect App
To test your final project in Virtual Reality or on your smartphone, you will need a smartphone or a VR headset (e.g. Oculus Go). This is optional, as you have another possibility to preview your project directly in the software. But we highly recommend it.
Please go ahead and download the VRdirect App from the App Store (for iOS), Google Play Store (for Android) or the Oculus Store. It is of course free of charge and easily findable by searching for “VRdirect”.
3. (Optional) Some 360° footage
Feel free to get some 360° footage of any kind (photos, videos, CGI renderings, …etc.) in advance.
You will use this content in the software to enrich with fancy interactivity.
If you have a 360° camera at hand and are eager to produce some images or videos, check out our guide to filming your own 360° material. Alternatively, you can use stock footage or download 360° videos from Youtube.
However, this preparation is optional as we are offering example material and test footage inside the software or on our support website.
4. The VRdirect Studio
The VRdirect Studio is the software that you will use to create your VR project. It enables you to make 360° and Virtual Reality content interactive and afterwards lets you consume and distribute it.
To create your VR project in accordance with this guide, the VRdirect Studio must be installed.
Please go to www.vrdirect.com, sign up for a new account and make use of the 30-day free trial period when choosing your license. You can cancel anytime during these 30 days to ensure that you won’t be upgraded to a paid license.
After doing so, you will reach a page where you can download and install the VRdirect Studio for macOS or Windows. Once installed, log into the Studio with your account and – voilà, you’re there!
Let’s dive in!
Creating your first project
When you first start the Studio, you will see a pop-up window with a few graphics that briefly explain what’s what in the VRdirect Studio. You can go through them or close them immediately as we will cover all these steps in more detail here.
What you will then see is a huge space, asking you to drop 360° footage or offering you to download example material in order to start with your VR project.
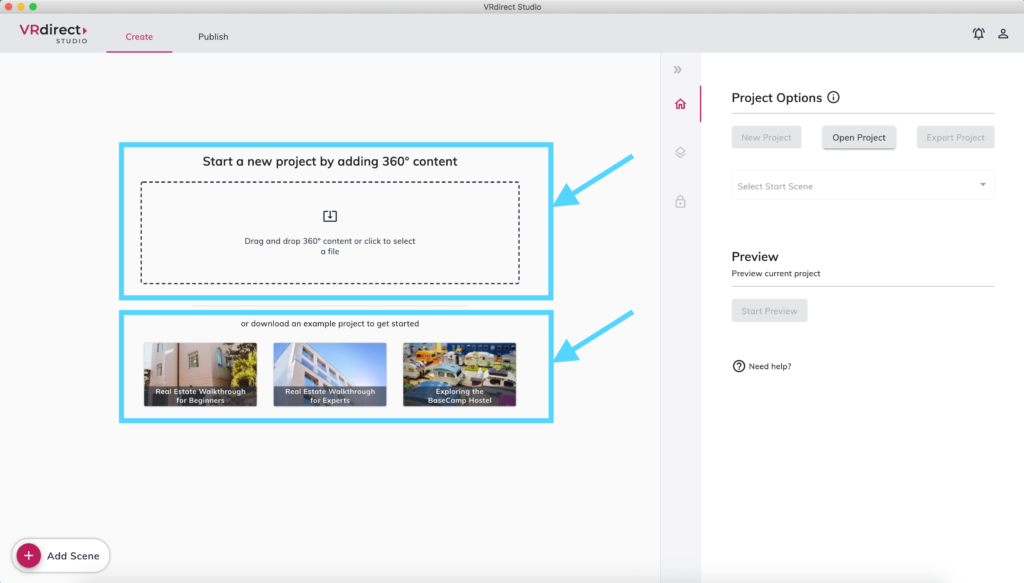
Once you’ve added 360° content, the software will automatically create a “scene” out of it, where you can look around. But more on those scenes later.
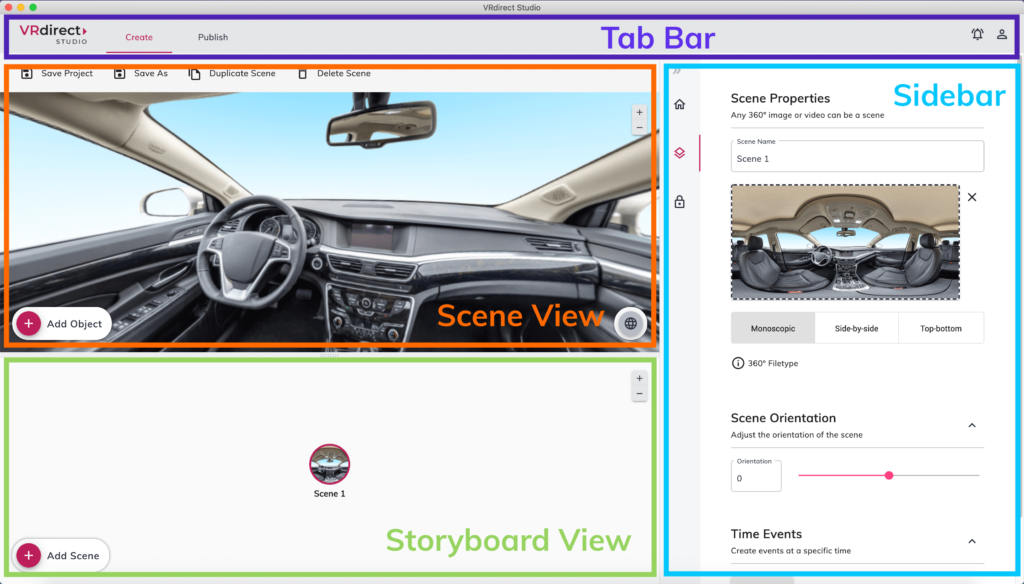
What you see now is that the software displays various sections. On top we have the tab bar, where you can switch between the Creation tab and the Publishing tab, view notifications or profile options. Underneath, the scene view, where you can drag around to view the 360° environment, zoom in/zoom out, show a coordinate grid for orientation purposes or add objects.
Even further underneath you will find the storyboard view, where all scenes of your project can be organised. The scene that is selected in the storyboard is what’s shown in the scene view.
Last but not least, the sidebar on the right that displays project options, the properties of your scenes and objects, and the so-called “background scene”.
Scenes and connections
In the VRdirect Studio, “scenes” represent 360° environments that are filled with 360° images and videos. One environment equals one scene. Hence, one 360° image/video equals one scene as well.
You can jump from one scene to the next by using “connections“. You’ll learn in a second how you can use these connections – but let’s continue with scenes first.
To add a new scene to your VR project, simply click on the magenta plus button (“Add Scene”) in the lower left corner of your storyboard. You will then have an empty scene, that you can fill with 360° content. This 360° content can be:
- Monoscopic / stereoscopic side-by-side / stereoscopic top-bottom images or videos that were captured with a 360° camera
- Monoscopic / stereoscopic side-by-side / stereoscopic top-bottom stock footage from the internet
- Monoscopic / stereoscopic side-by-side / stereoscopic top-bottom CGI images or videos that were rendered out of a 3D program (this is how you can also work with CAD data)
You can create as many scenes as you’d like. For organizational purposes, we recommend to give them proper scene names (change a name in the properties section of the sidebar) and arrange them with a logical layout structure in the storyboard (drag the small scenes around to move and place them accordingly).
In the sidebar section you will find some other scene properties. For example the scene orientation. When changing the orientation through the slider control, your 360° content will shift its focus on the X-axsis. That means: When entering this scene in VR the user will look into the shifted direction.
The “time events” at the bottom of the scene properties will be explained later.
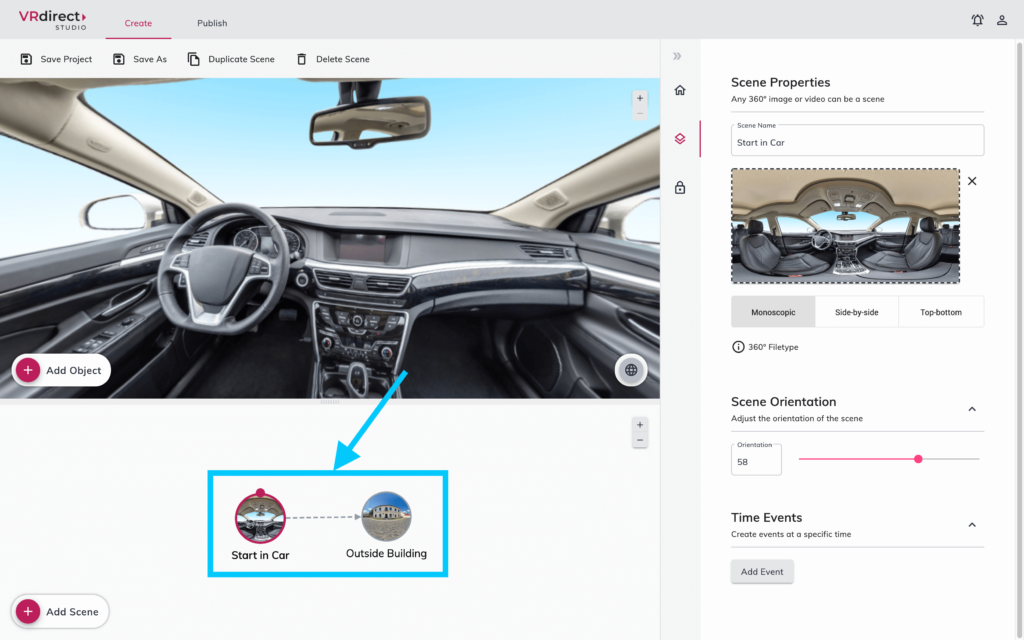
Once you’ve added at least two scenes you can connect them with each other. To do so, hover over your start scene until the magenta dot appears, then drag a connection arrow with your mouse from the magenta dot to your destination scene.
Tadaaaa! The scenes are there, the connection is there –> let’s add interactivity to trigger the connection.
Objects and interaction events
In order to add interactivity, you must add objects first.
Objects are added to a scene. Depending on what content you upload to your object – they can be images (PNG and JPG), videos (MP4), audio (MP3) and spatial audio (TBE).
Once you make the object interactive, they can show or hide additional information within a scene, start connections, start sounds and videos or even deactivate other buttons. You can use Photoshop or even Powerpoint to create icons, boxes, text-boxes, labels or frames -> save them as PNG or JPG and upload them to your object.
To add objects, select your scene and click on the magenta plus button (“Add Object”) in the lower left corner of your scene view. Move them around place them within your scene by simply dragging. Change the size of the object in the “Object Properties” of the sidebar and upload your media file in the drag and drop field below the name.
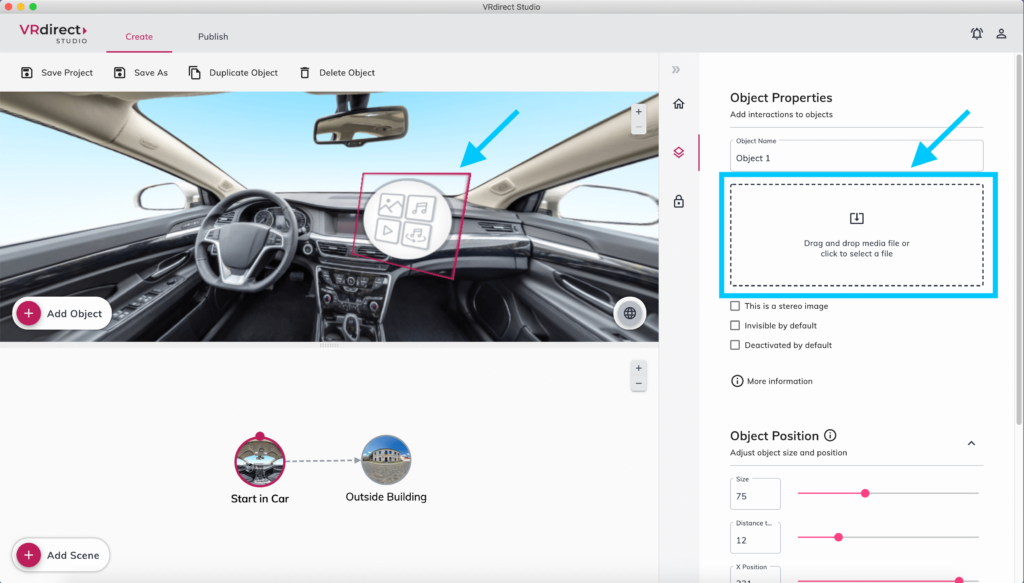
To make this object interactive, add a so-called “interaction event” at the bottom of the sidebar. Once added, you can choose how the user triggers the interaction: By selecting the object (Select), by gazing/hovering over the object (Gaze in) or by gazing away/leaving the object (Gaze out).
After the trigger, choose what type of interaction happens (e.g. connect scenes, start video or sound, hide object, …) and last but not least, what the target of the interaction is. This can either be another object or a scene that the user wants to jump into.
For now, you can do a test adding an interaction event with: Select -> Connect scenes -> Your second scene. This means that the scenes you previously created are now connected with each other and the connection will happen once the user selects your object.
Time Events
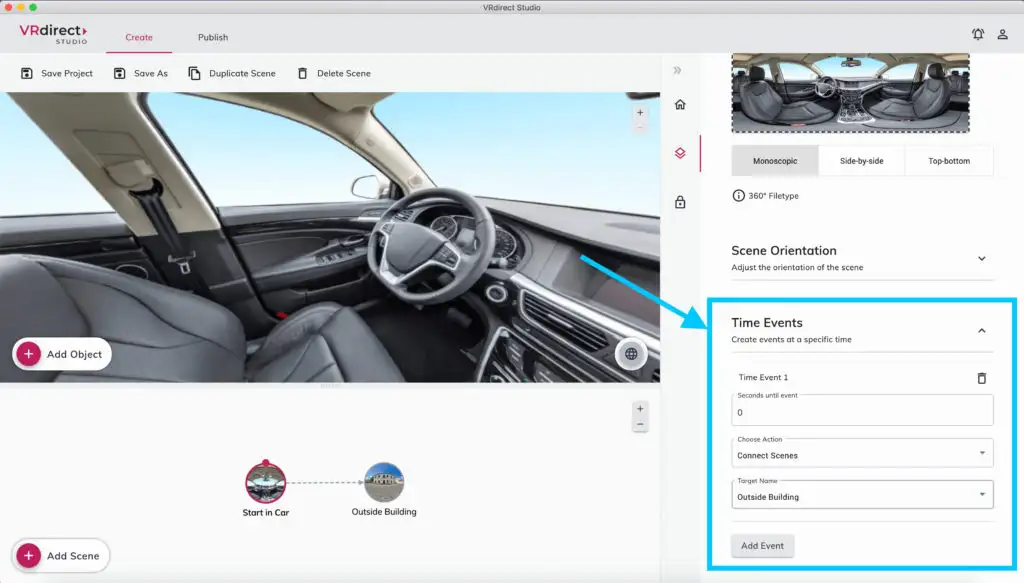
“Time events” are an additional way of triggering an action, besides interaction events. They are based on the time of a scene. For instance, you can use time events to let the user enter a scene and have an image appear after a set time.
To do so, select the scene where you would like to set the time event. In the properties sidebar on the bottom, click on “Add Event”. Then, set the seconds after which the action should happen and afterwards choose your desired action. The action will start automatically after this time.
For instance, add a time event with: 15 seconds -> Connect scenes -> Your second scene.
Background scene
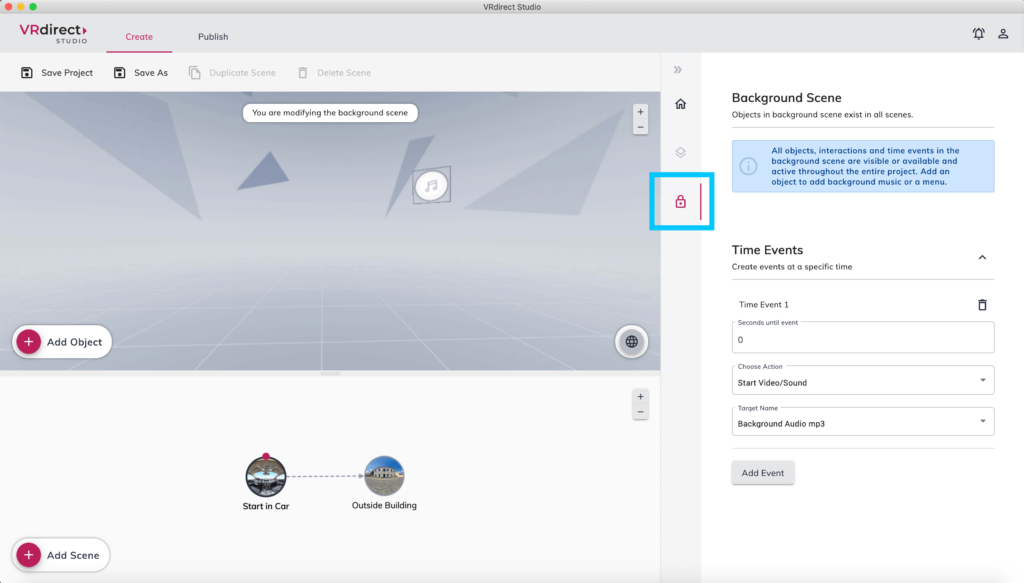
Let’s take a look at the 3rd tab in the sidebar: the background scene tab. The background scene contains all objects, time events and interactions that are running in the background – for example background music.
By clicking on the 3rd tab, a scene opens in the scene view that looks a little different from your other scenes. Everything that is added within this scene is available and active throughout your entire VR project.
For example, to insert background music: Add an object and upload some music (.mp3 file). Now add a time event to the background scene at second 0 that plays this audio object. If everything was done correctly, the audio plays in the background now while the user jumps from scene to scene. It is not affected by a scene change.
But how can you be sure that it worked? Easy, just do a live preview of the current status of your project…
Preview your project
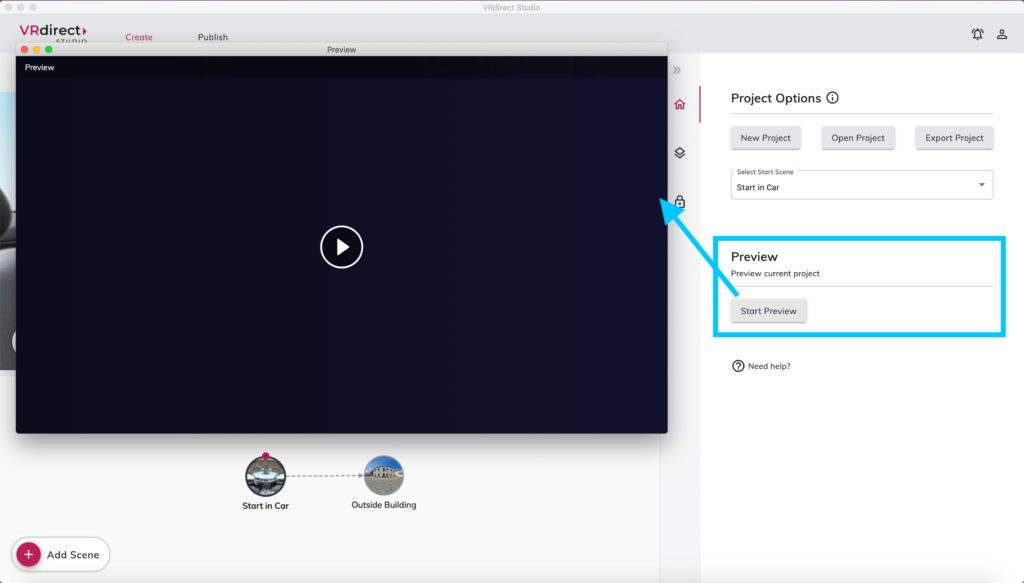
To do a preview you will get to know the first sidebar-tab. Here, you find options for your entire project: Start a new project, open an existing project, export your current project, select the scene that starts off your project – and of course the preview.
Start a preview by simply clicking on the obvious “Start Preview” button. A new window will open on top of the VRdirect Studio that enables you to check your project by navigating through it. Before making any changes on your existing project, make sure to close the preview window again.
Please make sure to save your project once in a while by clicking on “Save Project” in the tool bar at the top.
Wonderful, you’re done! You now know all important aspects of creating your first VR project. Whilst all of this is happening within the Creation tab of the VRdirect Studio, let’s take a look at the second tab (Publishing).
Manage and publish your project
After finishing your VR project, as mentioned before, please save your project as a .vrprj file.
We now want to show your awesome VR project to the world. Hence, click on “Publish” in the tab bar to switch to the second part of the Studio.
Here, all you can really do is upload and publish your project by clicking on the magenta plus button. Please do so. The software will then ask you to provide a title for your project (e.g. “The Ultimate Guide”).
Furthermore, your new project entry will be opened in a new tab, allowing you to still navigate back and forth and switch between the tabs.
For your project entry, add some general information like author name, short description or a thumbnail image, then save the information and move on to the upload section. Here, upload your .vrprj file that you previously created and saved in the Creation tab.
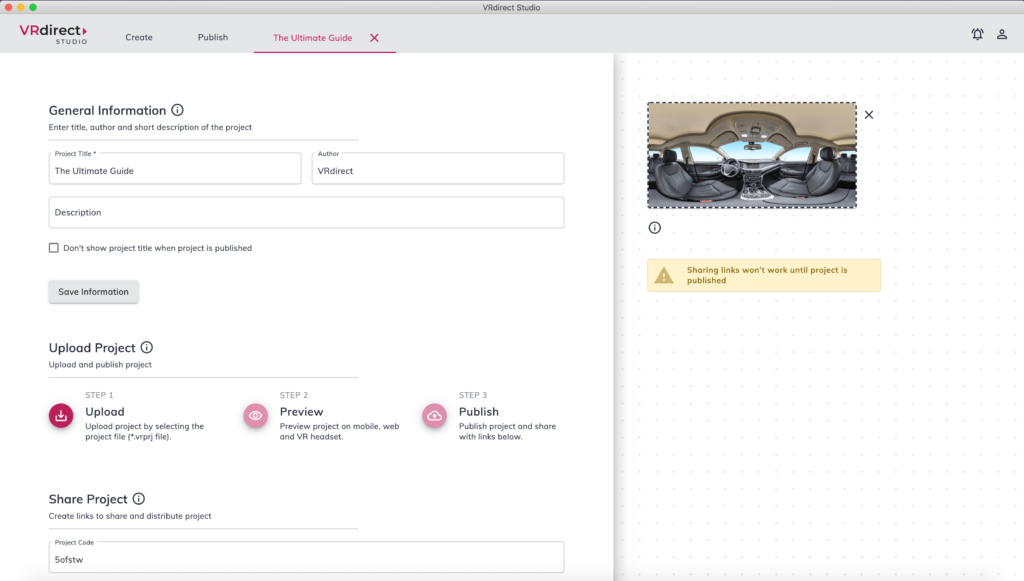
Once it is successfully uploaded, you are able to preview it one last time with links that you can also open on your mobile device or your VR headset. To view the links, please download and install the VRdirect App onto your devices (described in the intro text in step 2).
Finally, in the last step you can publish your VR project by clicking on the 3rd magenta button.
Now that it is published, it is available through the distribution links in the section below “Project sharing”.
Project Code: Enter the 6-digit code into the search field of the VRdirect app (on smartphone and VR headset) and your VR project will start.
App Link: Click on the link that automatically opens the pre-installed VRdirect app and leads to your VR project (on smartphone).
Web Link: Click on the link that will open a Web Browser and show your interactive VR project in VRdirect’s Web Player.
You can share any of these links using social media, email or other distribution channels.
You can also embed your VR project into your website, just like a YouTube video, by using the embed code. When clicking the icon, the embed code generator will open and lets you generate the HTML snippet that you need to insert into the source code of your website.
So this is it. This is the ultimate guide to creating your first interactive VR project without the necessity of any code. We sincerely hope that you like our VRdirect Studio and if you have any questions whatsoever, feel free leave a comment or contact our team via email (contact@www.vrdirect.com).
We will always be happy to assist you in any matter!
